conquering
Miner 2049er
Although Miner 2049er is available for almost every major video game and computer system around, Micro Fun’s ColecoVision adaptation may be the best version available. Not only do the system’s large memory and joystick/keypad controllers allow for special, computer-type features like independent control of lifts and elevators, but this version also contains an “eleventh level” not found in any other. You can even pause the game at any point, to study the level you’re on.
Special features aside, the best thing about this cartridge is the exciting game play. As you maneuver Bounty Bob through level after level of an abandoned uranium mine in search of the notorious Yukon Yohan, you must cover every inch of. catwalk while avoiding deadly mutants, leaping across pools of radioactive waste, and mastering the use of slides, lifts, elevators, sliding platforms, and even a TNT powered cannon.
Scattered around the mine are several miner tools such as lanterns, pickaxes, and shovels. When Bounty Bob touches one of these items, the mutants are temporarily neutralized for a brief time during which Bob can eliminate them forever by simply touching them. If they are not eliminated, they return to their normal color and become lethal once again.
SCORING

As Bounty Bob walks along the framework of each level, it becomes a solid color. When a level’s framework has been completely masked in this manner, you receive points for the time left on a bonus clock at the top of the screen. The timer begins at 3000 at the start of level one, and is reduced by 100 every couple of seconds. With each subsequent level, the starting time is increased by 500. If you fail to complete a screen in the time alloted, you lose a Bounty Bob.
You are also awarded five points for each small section of framework that you mask, 150 points for each miner’s tool you touch, 100 points for each mutant destroyed, and 150 points for each ton of TNT taken on level ten. You start the game with three Bounty Bobs and receive extras at 10,000, 30,000, and 50,000 points.
STRATEGIES
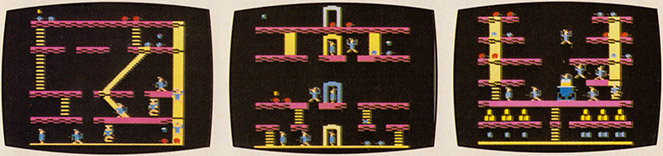
Miner 2049er is a difficult but engrossing climbing and jumping contest that requires you to learn intricate patterns in order to master each level. Simply knowing the patterns, however, will not guarantee success. Because exact timing and positioning is often crucial to the proper execution of a pattern, each one will have to be repeated several times before you will be able to confidently proceed through all eleven levels.
While the eleven patterns described below will get Bounty Bob safely through each level, they are, by no means, the only patterns that will work. In many cases, a missed lift or a safe but incorrect jump will cause you to abandon a planned pattern for some extemporaneous action. The player who can survive these pattern changes, and still complete the level with time to spare, is assured a high-scoring expedition.
LEVEL ONE
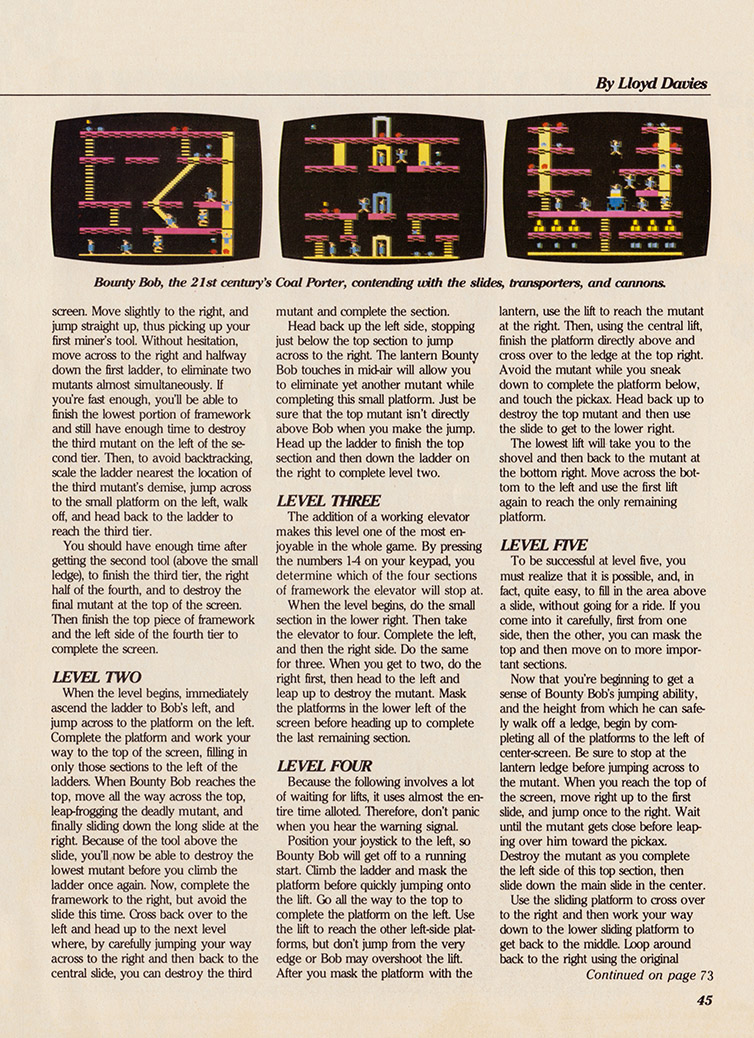
The first level begins with Bounty Bob in the bottom left comer of the screen. Move slightly to the right, and jump straight up, thus picking up your first miner’s tool. Without hesitation, move across to the right and halfway down the first ladder, to eliminate two mutants almost simultaneously. If you’re fast enough, you’ll be able to finish the lowest portion of framework and still have enough time to destroy the third mutant on the left of the second tier. Then, to avoid backtracking, scale the ladder nearest the location of the third mutant’s demise, jump across to the small platform on the left, walk off, and head back to the ladder to reach the third tier.
You should have enough time after getting the second tool (above the small ledge), to finish the third tier, the right half of the fourth, and to destroy the final mutant at the top of the screen. Then finish the top piece of framework and the left side of the fourth tier to complete the screen.
LEVEL TWO
When the level begins, immediately ascend the ladder to Bob’s left, and jump across to the platform on the left. Complete the platform and work your way to the top of the screen, filling in only those sections to the left of the ladders. When Bounty Bob reaches the top, move all the way across the top, leap-frogging the deadly mutant, and finally sliding down the long slide at the right Because of the tool above the slide, you’ll now be able to destroy the lowest mutant before you climb the ladder once again. Now, complete the framework to the right, but avoid the slide this time. Cross back over to the left and head up to the next level where, by carefully jumping your way across to the right and then back to the central slide, you can destroy the third mutant and complete the section.
Head back up the left side, stopping just below the top section to jump across to the right The lantern Bounty Bob touches in mid-air will allow you to eliminate yet another mutant while completing this small platform. Just be sure that the top mutant isn’t directly above Bob when you make the jump. Head up the ladder to finish the top section and then down the ladder on the right to complete level two.
LEVEL THREE
The addition of a working elevator makes this level one of the most enjoyable in the whole game. By pressing the numbers 14 on your keypad, you determine which of the four sections of framework the elevator will stop at. When the level begins, do the small section in the lower right. Then take the elevator to four. Complete the left, and then the right side. Do the same for three. When you get to two, do the right first, then head to the left and leap up to destroy the mutant. Mask the platforms in the lower left of the screen before heading up to complete the last remaining section.
LEVEL FOUR
Because the following involves a lot of waiting for lifts, it uses almost the entire time alloted. Therefore, don’t panic when you hear the warning signal.
Position your joystick to the left, so Bounty Bob will get off to a running start. Climb the ladder and mask the platform before quickly jumping onto the lift. Go all the way to the top to complete the platform on the left. Use the lift to reach the other left-side platforms, but don’t jump from the very edge or Bob may overshoot the lift. After you mask the platform with the lantern, use the lift to reach the mutant at the right Then, using the central lift, finish the platform directly above and cross over to the ledge at the top right. A void the mutant while you sneak down to complete the platform below, and touch the pickax. Head back up to destroy the top mutant and then use the slide to get to the lower right.
The lowest lift will take you to the shovel and then back to the mutant at the bottom right. Move across the bottom to the left and use the first lift again to reach the only remaining platform.
LEVEL FIVE
To be successful at level five, you must realize that it is possible, and, in fact, quite easy, to fill in the area above a slide, without going for a ride. If you come into it carefully, first from one side, then the other, you can mask the top and then move on to more important sections.
Now that you’re beginning to get a sense of Bounty Bob’s jumping ability, and the height from which he can safely walk off a ledge, begin by completing all of the platforms to the left of center-screen. Be sure to stop at the lantern ledge before jumping across to the mutant. When you reach the top of the screen, move right up to the first slide, and jump once to the right. Wait until the mutant gets close before leaping over him toward the pickax. Destroy the mutant as you complete the left side-of this top section, then slide down the main slide in the center.
Use the sliding platform to cross over to the right and then work your way down to the lower sliding platform to get back to the middle. Loop around back to the right using the original sliding platform, and head up the right side to complete the screen.
LEVEL SIX
Carefully move up three stops and wait for the sliding platform to take you to the lantern. Jump up to the top left to destroy one mutant Then hop across the top level of platforms to eliminate the mutant at the right. Move back along the top to the middle and walk off of the left side of the central platform. Walk off once more, and jump to the platform to the left. Take the sliding platform to the center, and jump up to touch the shovel. Work your way to the right to destroy the third mutant and complete those sections before heading back to the middle platform with the mutant and short slide. When the mutant goes to the left, drop down on his right and then leap-frog him when he comes back. You can now kill him, slide down to the moving platform, and finish off the bottom right.
LEVEL SEVEN
When jumping onto or off of the lifts, always jump slightly before the lift arrives so you’ll land when the lift reaches the same level. As you complete the platforms on the left side of the screen, be sure to leap onto the pickax platform from almost the center of the lift. This way, you can wait on the edge without touching the pickax until the lift is moving back up. It can then be used to eliminate the first mutant.
From the mutant’s ledge, jump up to the left and mask the two platforms joined by a ladder. Then use the lift to return to the mutant’s ledge. Watch the third lift from the left until it’s at the halfway point heading up. Then quickly leap up to the lantern and acros.5 to the right before walking off the platform, onto the lift, just as it reaches the top. Immediately jump again to the right before the lift has a chance to descend, and then to the top of the slide to wipe out two mutants in a row. Finally, use the slide and the nearest lift to complete the rest of the screen.
LEVEL EIGHT
Once you get the hang of the hydraulic lift, this is one of the easiest screens to complete. To operate it, push #5 on your keypad, and then use the joystick to raise and lower the lift. Push the jump button again to reactivate Bounty Bob.
Begin by masking the two platforms joined by the ladder at the right Don’t fall down the slide or you’ll be doomed to remain on that small ledge until the timer runs out. Use the lift to reach the upper levels before sliding down at the left. As you jump back to the lift, the shovel will enable you to destroy the mutant one level below. Then complete the platform below before heading back to the top of the screen to slide down and finish level eight.
LEVEL NINE
Officially dubbed the “stomper” or “pulverizer” screen, this one is actually a Jot less dangerous than it sounds. The trick here is to walk under the piston-like stompers one at a time rather than trying to run through all four at once.
The entire screen is easily completed by repeatedly climbing up the right side and using the sliding platforms to get to the left. Be sure to mask completely each left-side platform you land on because the sliding platforms can only be used once. Use the slide to return to the bottom and avoid the stompers on your way back to the right.
LEVEL TEN
This screen is a blast. Really! Here Bounty Bob must eat bundles of TNT at the bottom left of the screen before being shot out of a cannon to reach the upper tiers. One bundle will send him to the first tier, three will propel him to the third Any more, and he goes through the roof. The real problem is that the mutants can’t be destroyed and have to be skillfully avoided.
With that in mind, use the first two single bundles of TNT to reach the lowest right and left platforms respectively. Take the double bundles by moving Bob directly under them and jumping up. This time, however, do the left side first. Reach the highest level on the right by taking the remaining single, and double bundle together. To reach the highest left-side platform, take the triple charge furthest left. If you try for the triple on the right, you’ll usually end up with six. Finally, when shooting up or sliding down, be sure the path is clear of mutants.
LEVEL ELEVEN
The directions make this one sound like a freebie. “Take the uranium and collect bonus points.” What they don’t tell you is that to get to the uranium, you must master one of the toughest screens in the entire game.
At any rate, use the sliding platforms to reach the three small ledges on the right. Here you’ll find a couple more mutants to jump, and barely enough room to move. Use the smallest sliding platform to reach the central section of framework, and the diagonal lift. Avoiding the slides, complete the platform at the bottom left and let its moving edge take you to within jumping distance of the platform at the lower right A few more jumps, and a trip down the slide, and you’re home free.
COMMENTS
Now that you have the basics, all that’s left is to master the techniques required for each level. Miner 2049er can’t be conquered in a single night, but the thrill of discovering each new screen, and the sense of accomplishment upon completing a level, should hold your interest for as long as it takes. This one may just outlast your joysticks.
Source Pages
Continue Reading