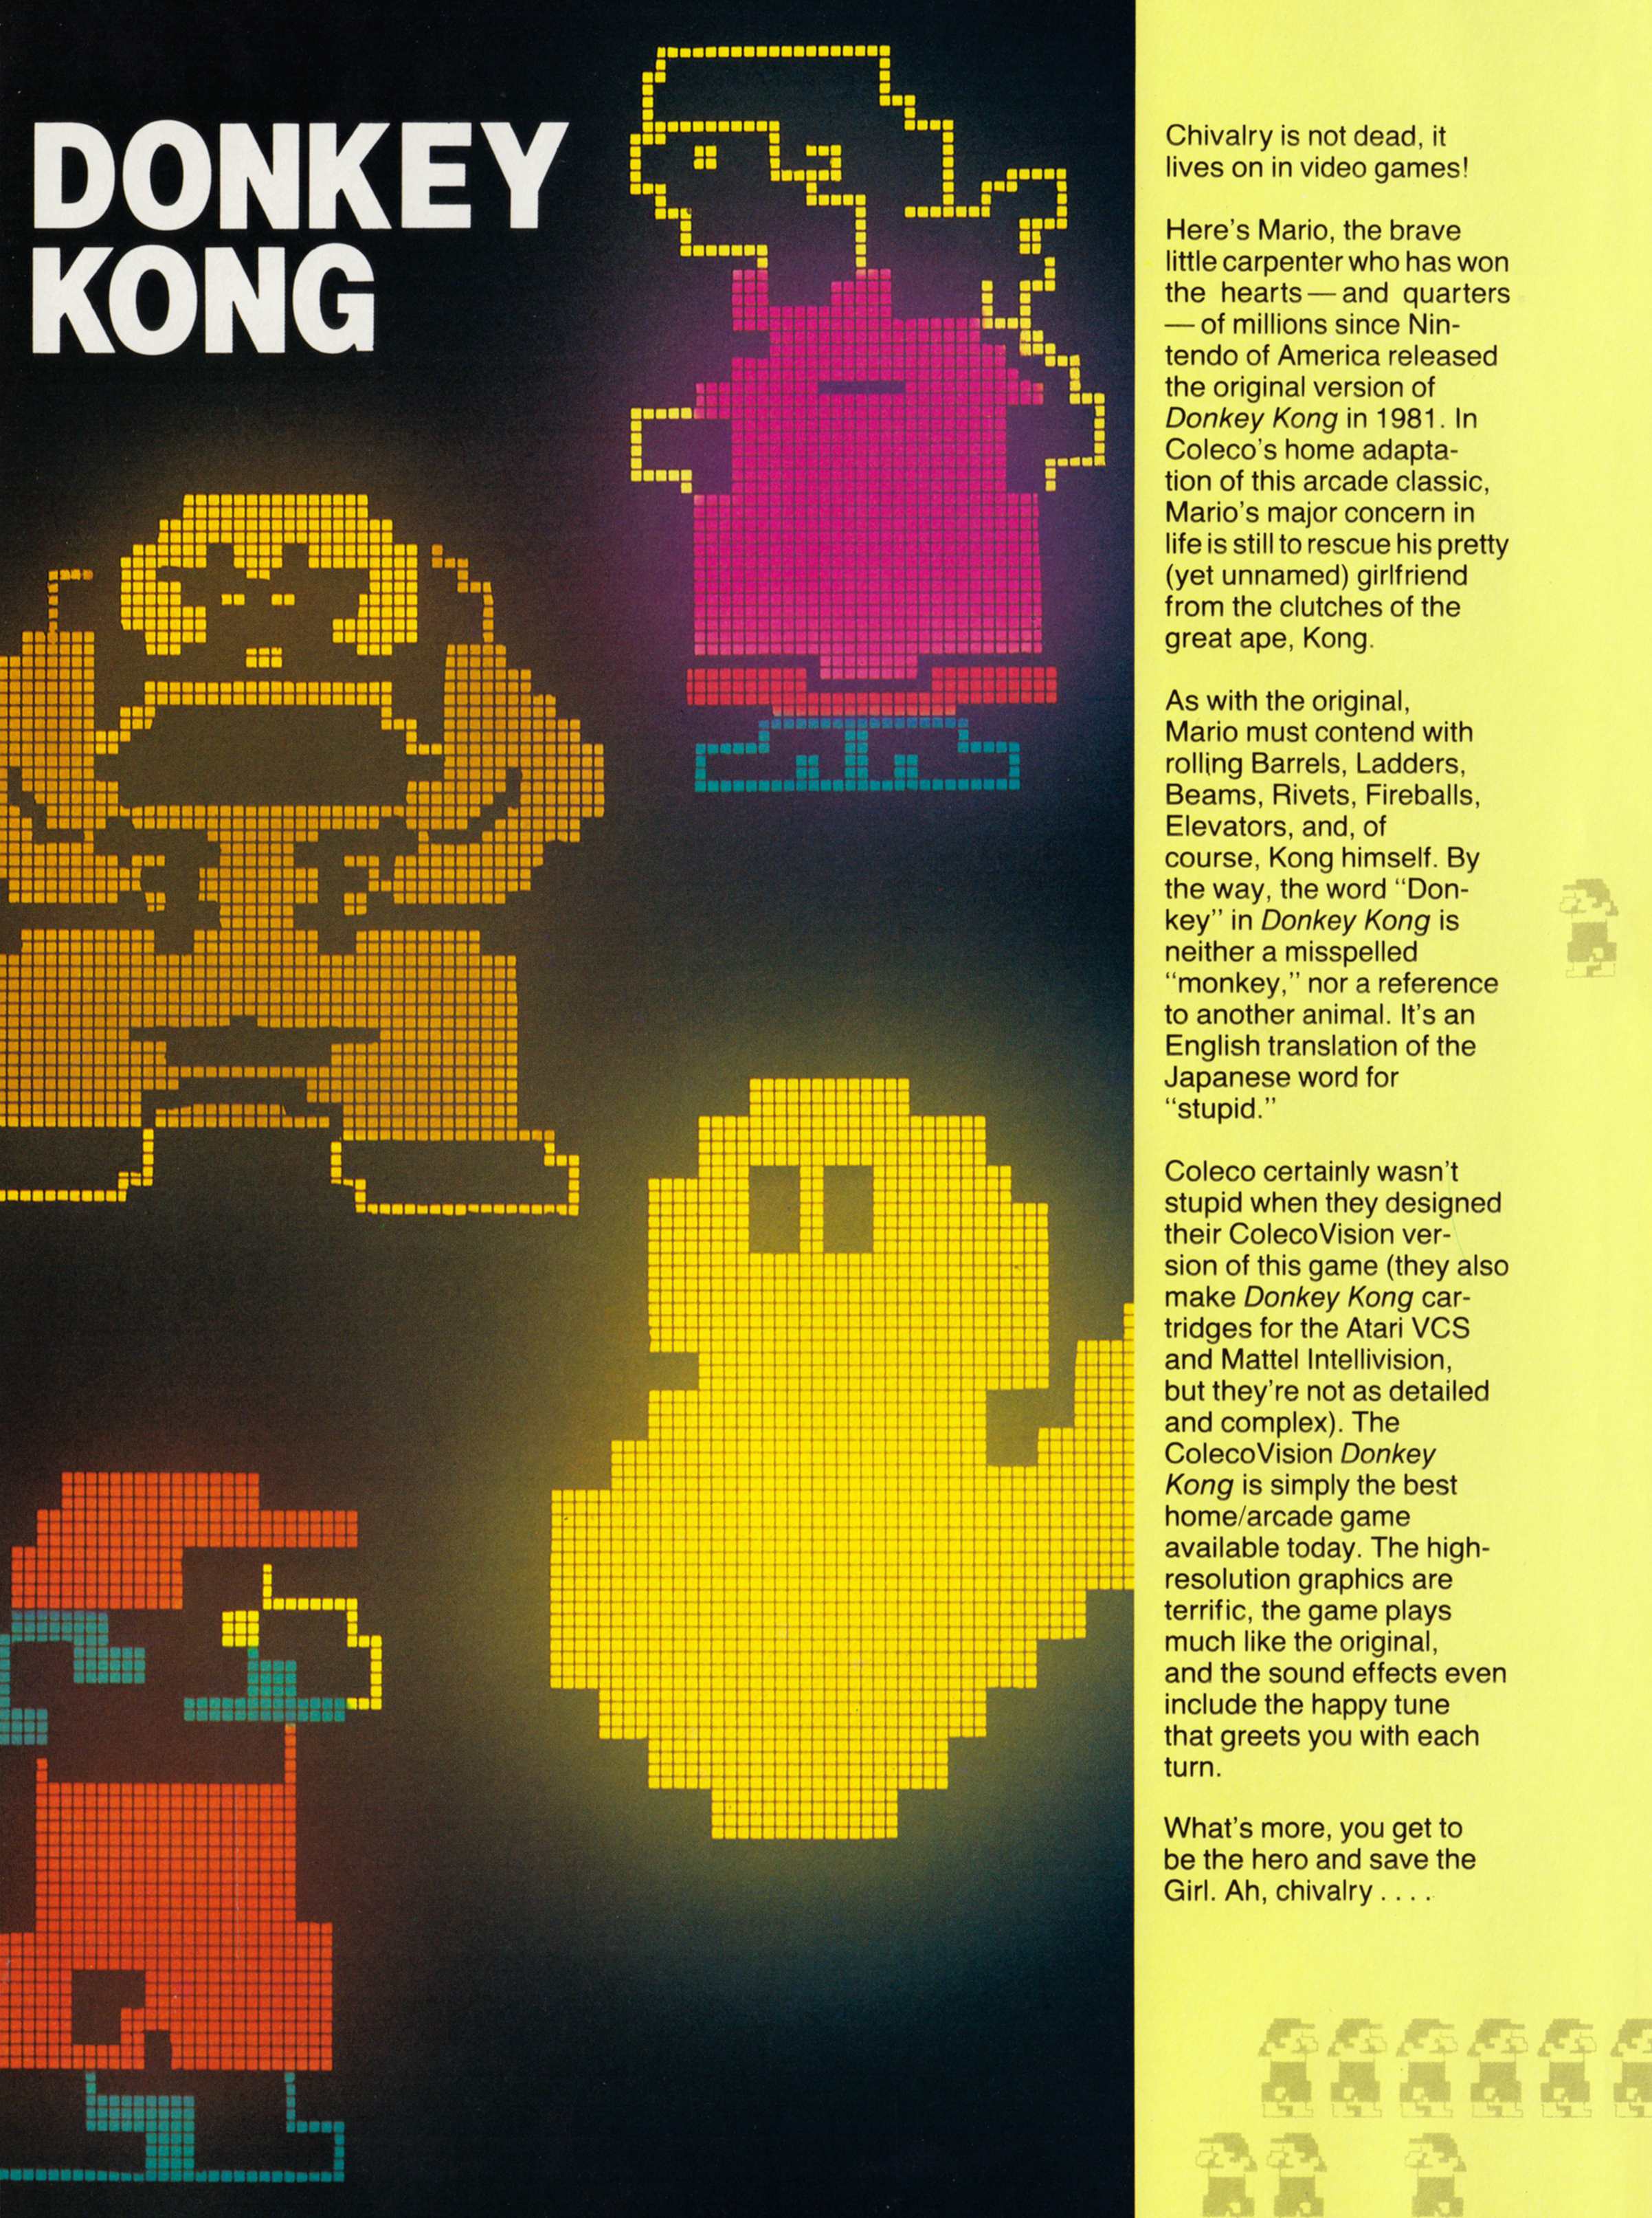
Donkey Kong
Chivalry is not dead, it lives on in video games!
Here’s Mario, the brave little carpenter who has won the hearts — and quarters — of millions since Nintendo of America released the original version of Donkey Kong in 1981. In Coleco’s home adaptation of this arcade classic, Mario’s major concern in life is still to rescue his pretty (yet unnamed) girlfriend from the clutches of the great ape, Kong.
As with the original, Mario must contend with rolling Barrels, Ladders, Beams, Rivets, Fireballs, Elevators, and, of course, Kong himself. By the way, the word “Donkey” in Donkey Kong is neither a misspelled “monkey,” nor a reference to another animal. It’s an English translation of the Japanese word for “stupid.”
Coleco certainly wasn’t stupid when they designed their ColecoVision version of this game (they also make Donkey Kong cartridges for the Atari VCS and Mattel Intellivision, but they’re not as detailed and complex). The ColecoVision Donkey Kong is simply the best home/arcade game available today. The highresolution graphics are terrific, the game plays much like the original, and the sound effects even include the happy tune that greets you with each turn.
What’s more, you get to be the hero and save the Girl. Ah, chivalry….
Coleco Industries, Inc.
for ColecoVision (included with ColecoVision basic unit)
1 or 2 players
Rating: PG
Graphics: 10
Game Play: 10
Longevity: 10
OBJECTIVES
To save Mario’s Girlfriend and collect as many points as possible by: a) jumping over and/or smashing Barrels; b) removing Rivets; c) jumping over and/or smashing Fireballs; d) grabbing Prizes; and e) collecting bonus points upon completion of each screen.
CONTROLLERS
Donkey Kong is played using the ColecoVision controller. Pushing the joystick to the right or left will cause Mario to move in that direction. Pushing the joystick up or down will make Mario climb up or down Ladders. Pressing the left action button will make Mario jump. The joystick action is often frustratingly slow in Donkey Kong. The stubby controller doesn’t help much, either. The joystick is too stiff to do a good job of maneuvering it entirely with your thumb, and yet it is too short to be able to effectively grab onto it. As with everything else, practice makes perfect.
ELEMENTS
Mario: This is you — the hero. Initially spend your time learning how to maneuver Mario around the screen. Don’t worry about your score just yet. Learn how to climb Ladders and jumb Barrels and Fireballs with ease. Once you learn these basics, the real strategy begins.
Donkey Kong: This big gorilla is always at the top of a girder pattern. In the first screen he throws Barrels at you. Don’t worry about him, though (just don’t go near him or you’re dead), just worry about those Barrels.
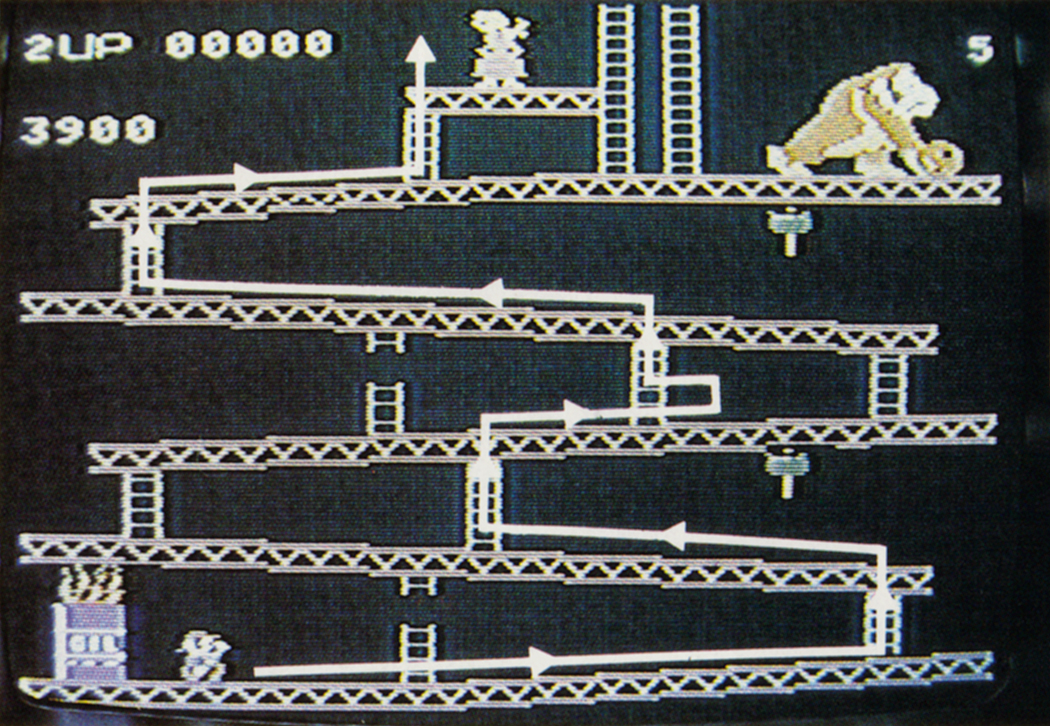
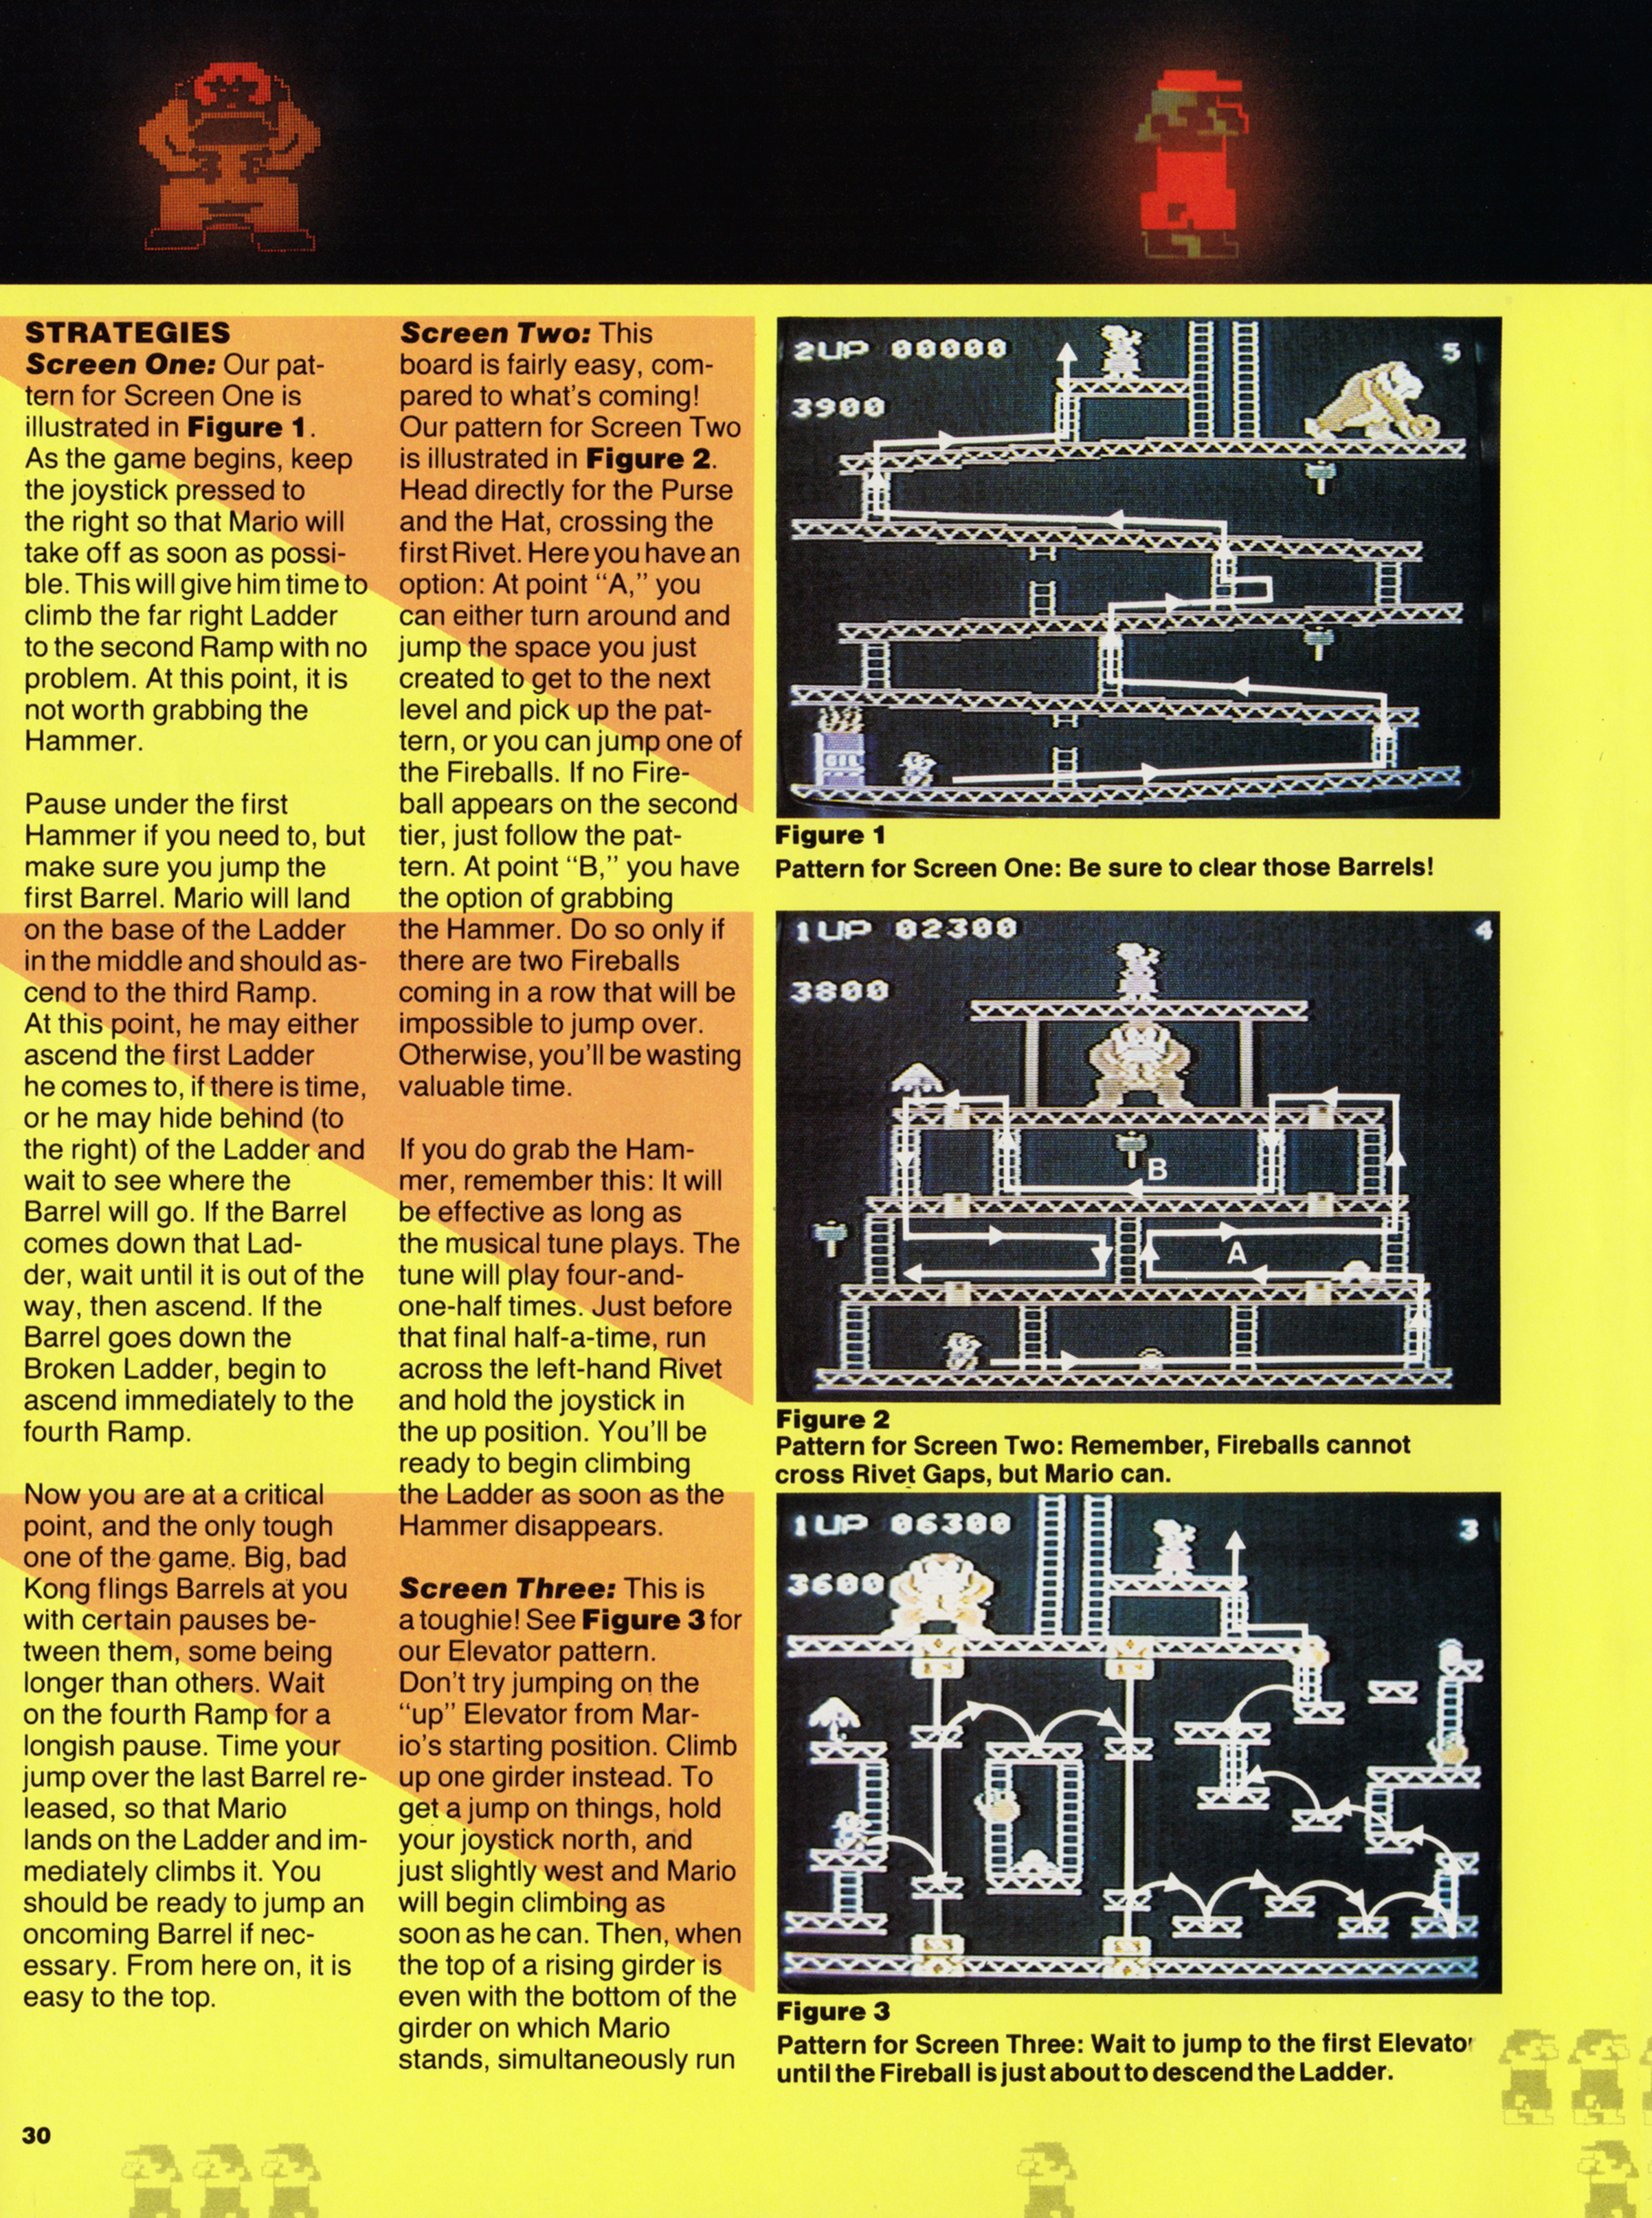
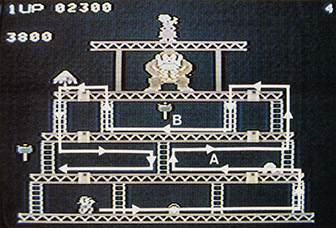
Pattern for Screen One: Be sure to clear those Barrels!
Mario’s Girlfriend: Although the object of the game is to reach her, you never will. Every time you come close, Kong transports her to another level of girders.
Ladder: It is essential to climb Ladders to reach the top of a screen. You cannot jump on or off of a Ladder. You must completely climb a Ladder before you can proceed. You can’t completely climb up or down broken Ladders, but you can use them to duck out of the way of a Barrel in certain emergency circumstances. Whatever you do, don’t stand under a Ladder — your enemies will find you and attack.
Hammer: Hammers appear on the Ramps and Rivets screens (two on each screen). Practice using them — they’re the only way to smash Barrels and Fireballs for both points and survival. You must jump straight up to grab a Hammer. You will be able to use the Hammer for about 11 seconds (you’ll hear a heroic tune while using it). Don’t move when using the Hammer — let your enemies run into you. This way, you’ll be more prepared to jump over them should the Hammer disappear at the last second.
Barrels: Barrels can usually be found rolling down Ramps. At times, however, they will turn on their sides and plummet down Ladders (either solid or broken Ladders). You can either jump over rolling Barrels or smash them with a Hammer. Barrels are worth 100 points when jumped; 300 points when smashed.
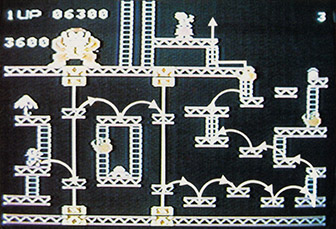
Pattern for Screen Two: Remember, Fireballs cannot cross Rivet Gaps, but Mario can.
Fireballs: These fast-moving flames appear in the Rivets and Elevators screens. They always originate from the right and left-hand sides of the second girder level, and on three levels in the Elevators screen. Avoid them — they can move faster than Mario can. Fireballs cannot, however, cross an unplugged rivet gap. You can either jump over or smash them with a Hammer. Fireballs are worth 100 points when jumped; 300 points when smashed.
Ramps: You can run up or down the Ramps; Barrels, however always roll down.
Rivets: You must unplug all six of these to clear the Rivets screen. Walk or jump over a Rivet to clear it. Once cleared, you must jump over the gap it creates. Eliminating a Rivet is worth 100 points.
Elevators: These move at a constant speed, up and down. Jump onto an “Up” Elevator when it’s just below you; jump on a “Down” Elevator when it’s just above you.
Prizes: The lady’s Purse, Hat, and Umbrella appear on the Rivets and Elevators screens. They will earn you bonus points if you collect them (walk over them). Don’t go out of your way to get them, however — you’ll lose time and run the risk of getting burned by a Fireball. Grabbing a prize is worth 300 points.
Pattern for Screen Three: Wait to jump to the first Elevator until the Fireball is just about to descend the Ladder.
Bonus: This appears at the upper left-hand corner of the screen. The Bonus indicator serves two purposes. It: a) gives you extra points when you clear a screen and b) serves as a time clock. The Bonus will count down progressively as you attempt to clear a screen. You collect whatever is left of the Bonus when you clear the screen. If it counts down to zero, you lose a life.
VARIATIONS
Donkey Kong contains eight variations — four one-player games and four two-player games. Games 1 and 5 allow you five Marios; Games 2 through 4 and 6 through 8 feature only three Marios. Also, the speed of the game elements increases in these three-Mario contests, with Games 4 and 8 being the fastest. However, this variation in speed is only slight. Outside of the number of Marios, we found no significant differences between Games 1 and 4.
STRATEGIES
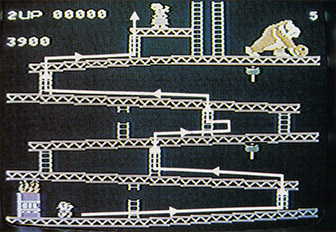
Screen One: Our pattern for Screen One is illustrated in Figure 1. As the game begins, keep the joystick pressed to the right so that Mario will take off as soon as possible. This will give him time to climb the far right Ladder to the second Ramp with no problem. At this point, it is not worth grabbing the Hammer.
Pause under the first Hammer if you need to, but make sure you jump the first Barrel. Mario will land on the base of the Ladder in the middle and should ascend to the third Ramp. At this point, he may either ascend the first Ladder he comes to, if there is time, or he may hide behind (to the right) of the Ladder and wait to see where the Barrel will go. If the Barrel comes down that Ladder, wait until it is out of the way, then ascend. If the Barrel goes down the Broken Ladder, begin to ascend immediately to the fourth Ramp.
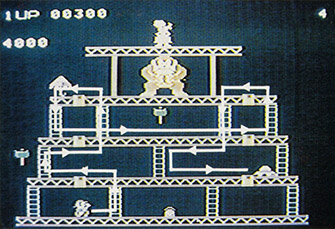
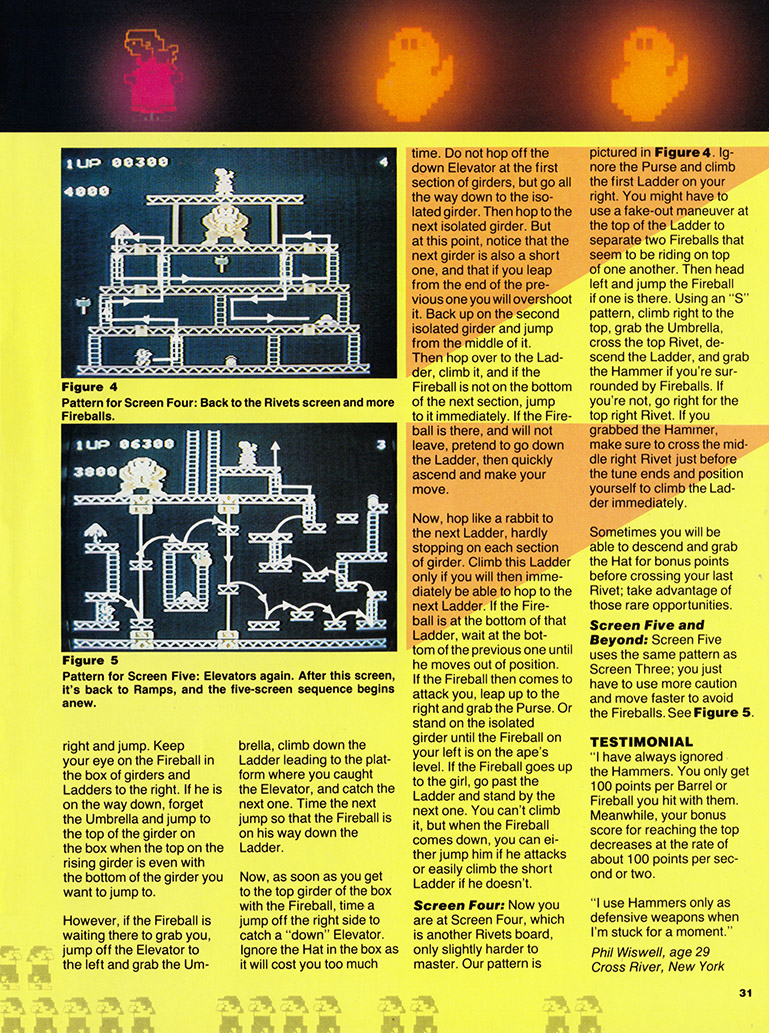
Pattern for Screen Four: Back to the Rivets screen and more Fireballs.
Now you are at a critical point, and the only tough one of the game. Big, bad Kong flings Barrels at you with certain pauses between them, some being longer than others. Wait on the fourth Ramp for a longish pause. Time your jump over the last Barrel released, so that Mario lands on the Ladder and immediately climbs it. You should be ready to jump an oncoming Barrel if necessary. From here on, it is easy to the top.
Screen Two: This board is fairly easy, compared to what’s coming! Our pattern for Screen Two is illustrated in Figure 2. Head directly for the Purse and the Hat, crossing the first Rivet. Here you have an option: At point “A,” you can either turn around and jump the space you just created to get to the next level and pick up the pattern, or you can jump one of the Fireballs. If no Fireball appears on the second tier, just follow the pattern. At point “B,” you have the option of grabbing the Hammer. Do so only if there are two Fireballs coming in a row that will be impossible to jump over. Otherwise, you’ll be wasting valuable time.
If you do grab the Hammer, remember this: It will be effective as long as the musical tune plays. The tune will play four-and-one-half times. Just before that final half-a-time, run across the left-hand Rivet and hold the joystick in the up position. You’ll be ready to begin climbing the Ladder as soon as the Hammer disappears.
Pattern for Screen Five: Elevators again. After this screen, it’s back to Ramps, and the five-screen sequence begins anew.
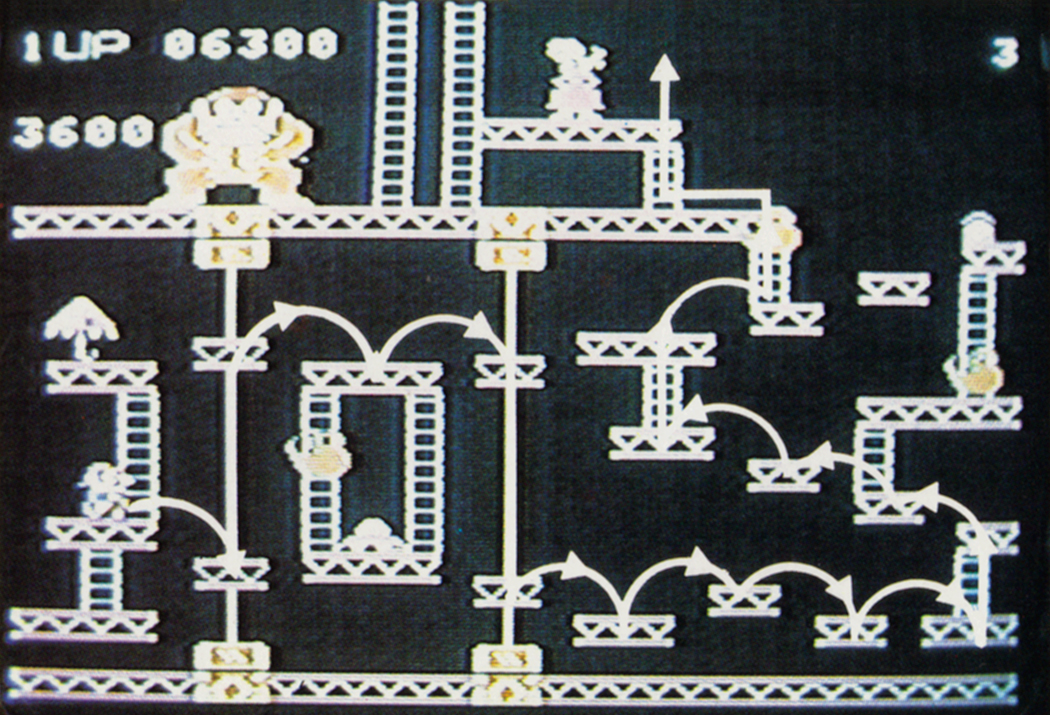
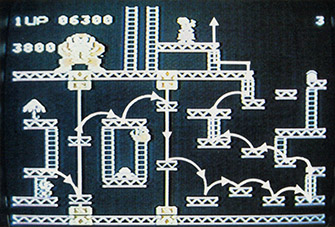
Screen Three: This is a toughie! See Figure 3 for our Elevator pattern. Don’t try jumping on the “up” Elevator from Mario’s starting position. Climb up one girder instead. To get a jump on things, hold your joystick north, and just slightly west and Mario will begin climbing as soon as he can. Then, when the top of a rising girder is even with the bottom of the girder on which Mario stands, simultaneously run right and jump. Keep your eye on the Fireball in the box of girders and Ladders to the right. If he is on the way down, forget the Umbrella and jump to the top of the girder on the box when the top on the rising girder is even with the bottom of the girder you want to jump to.
However, if the Fireball is waiting there to grab you, jump off the Elevator to the left and grab the Umbrella, climb down the Ladder leading to the platform where you caught the Elevator, and catch the next one. Time the next jump so that the Fireball is on his way down the Ladder.
Now, as soon as you get to the top girder of the box with the Fireball, time a jump off the right side to catch a “down” Elevator. Ignore the Hat in the box as it will cost you too much time. Do not hop off the down Elevator at the first section of girders, but go all the way down to the isolated girder. Then hop to the next isolated girder. But at this point, notice that the next girder is also a short one, and that if you leap from the end of the previous one you will overshoot it. Back up on the second isolated girder and jump from the middle of it. Then hop over to the Ladder, climb it, and if the Fireball is not on the bottom of the next section, jump to it immediately. If the Fireball is there, and will not leave, pretend to go down the Ladder, then quickly ascend and make your move.
TESTIMONIAL
“I have always ignored the Hammers. You only get 100 points per Barrel or Fireball you hit with them. Meanwhile, your bonus score for reaching the top decreases at the rate of about 100 points per second or two.
“I use Hammers only as defensive weapons when I’m stuck for a moment.”
Phil Wiswell, age 29
Cross River, New York
Now, hop like a rabbit to the next Ladder, hardly stopping on each section of girder. Climb this Ladder only if you will then immediately be able to hop to the next Ladder. If the Fireball is at the bottom of that Ladder, wait at the bottom of the previous one until he moves out of position. If the Fireball then comes to attack you, leap up to the right and grab the Purse. Or stand on the isolated girder until the Fireball on your left is on the ape’s level. If the Fireball goes up to the girl, go past the Ladder and stand by the next one. You can’t climb it, but when the Fireball comes down, you can either jump him if he attacks or easily climb the short Ladder if he doesn’t.
Screen Four: Now you are at Screen Four, which is another Rivets board, only slightly harder to master. Our pattern is pictured in Figure 4. Ignore the Purse and climb the first Ladder on your right. You might have to use a fake-out maneuver at the top of the Ladder to separate two Fireballs that seem to be riding on top of one another. Then head left and jump the Fireball if one is there. Using an “S” pattern, climb right to the top, grab the Umbrella, cross the top Rivet, descend the Ladder, and grab the Hammer if you’re surrounded by Fireballs. If you’re not, go right for the top right Rivet. If you grabbed the Hammer, make sure to cross the middle right Rivet just before the tune ends and position yourself to climb the Ladder immediately.
Sometimes you will be able to descend and grab the Hat for bonus points before crossing your last Rivet; take advantage of those rare opportunities.
Screen Five and Beyond: Screen Five uses the same pattern as Screen Three; you just have to use more caution and move faster to avoid the Fireballs. See Figure 5.
Source Pages


Continue Reading